How many times have you made a purchase online? The likely answer is: a lot. So, how would you feel if a site you purchased from didn’t handle your personal data carefully? You may have an amazing site on your hands, but if you handle customer information recklessly, sooner or later it’s going to come back to bite you in the rear.
There’s no excuse for laxness when handling any sensitive information entered onto your site, especially when you can now easily obtain and set up an SSL certificate from any number of providers.
Today we’ll go over what these certificates do and why you should consider getting one, then show you where to get them from. Finally, we’ll teach you how to configure your WordPress website to load over SSL.
Let’s get cracking!
What Are SSL Certificates and Why Do I Need One?
Simply put, a Secure Sockets Layer (SSL) certificate lets a user know that the connection between a site and their browser is secure for sharing information. All data exchanged through this connection will be encrypted, and only its intended recipients should be able to access it.
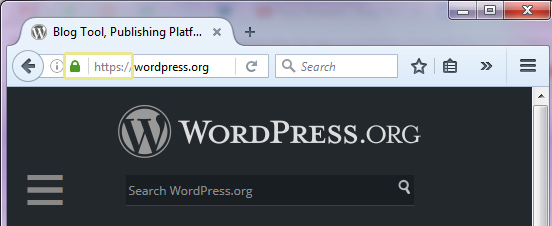
When you visit a site that has an SSL certificate, your browser makes sure the site is trusted and uncompromised. In most cases, this is visualized through a lock symbol that appears in your browser’s search bar, as well as displaying the HTTP Secure (HTTPS) URL prefix:

SSL certificates are especially vital for e-commerce sites, or pretty much anywhere you’re handling sensitive data. If security isn’t enough of an incentive, Google prioritizes sites that employ the HTTPS protocol within its rankings.
How Do I Get an SSL Certificate?
SSL certificates are dispensed by companies referred to as certificate authorities. These are trusted entities that are in a position to tell browsers, “Hey, you can trust this site!”, and you can either purchase certificates directly from them, or use an intermediary (such as a hosting provider). The biggest players on the market these days are:
Comodo
GeoTrust
GoDaddy
GlobalSign
Let’s Encrypt
Thawte
Symantec
As long as you’re obtaining a certificate from a valid authority, you’re ready to go – but it’s also worth noting that there are several kinds of certificates available, including:
- Domain validated certificates: These certify that the domain in question is valid.
- Organization validated certificates: Provided after a review to established organizations with physical addresses.
- Extended validation certificates: Given after an exhaustive review process to organizations adhering to high security standards.
- Wildcard certificates: Valid for all the subdomains of any given domain.
You can check out an exhaustive comparison of the different SSL certificates available on WhichSLL, including prices, validation levels, and the speed at which they’re issued (some are instant, while others will make you wait for a couple of days).
Once you’ve chosen which kind of certificate to get, simply locate the SSL/TLS option on your hosting provider’s cPanel, which should enable you to generate a Certificate Signing Request (CSR):

You’ll have to enter this CSR when applying for your certificate, as well as provide some other personal information. Once that’s done and the certificate is ready, it’s time to configure your WordPress site to use it properly.
How to Set Up SSL for Your WordPress Website
These steps may sound a little intimidating, but don’t worry – if you’ve followed some of our past WordPress tutorials, they should be a walk in the park. All you need is an FTP manager (such as FileZilla), and a simple text editor. If you need to brush up on your FTP skills, you’ll also need an easy to follow guide.
Configure Your Login Screens and Admin Area to Use SSL
Now that you have your SSL certificate, it’s time to set your WordPress site to load over the secure protocol.
The two most important screens where you should enforce these rules are your login screens and dashboard. Open your FTP manager, then head over to the public_html folder. Inside, you’ll find a file named wp-config.php:
Right-click and select View/Edit to open it up, then add the following somewhere before the /* That’s all, stop editing! Happy blogging. */ line:
define(‘FORCE_SSL_ADMIN’, true);Save the changes, close your editor, and give yourself a pat on the back – you just set up SSL for both of the pages above in a matter of minutes! However, there’s still one step to go.
Force the Rest of Your WordPress Site to Load Over HTTPS
We’ve already established that HTTPS is the bee’s knees, so let’s configure our entire site to load over it instead of leaving things up to chance. To achieve this, we’re going to implement a simple redirect using the .htaccess file located in the public_html folder:
Open it and type the following above everything else in that file:
<IfModule mod_rewrite.c>
RewriteEngine On
RewriteCond %{SERVER_PORT} 80
RewriteRule ^(.*)$ https://www.yourdomaingoeshere.com/$1 [R,L]
</IfModule>
Save your changes, close the editor, then browse to your site. You should see the green lock and the HTTP prefix next the URL, which means you’re all set!
Conclusion
Handling your customer’s personal data correctly is crucial for trust, and failing to do so earns you a reputation you may not shake easily.
Using the SSL protocol is by no means a silver bullet when it comes to protecting your website, but it’s a substantial measure that shouldn’t be overlooked, considering how simple it is to set up. Let’s recap the steps you’ll need to take to set up SSL on your own website:
- Decide which kind of SSL certificate you want.
- Check out if your hosting provider can set you up with one.
- If your host doesn’t offer SSL certificates, compare offers using WhichSSL.
- After receiving your certificate, configure your login screens and admin area to use SSL.
- Configure the rest of your site to load over HTTPS for additional security.
Are you looking to set up an SSL certificate on your WordPress site? Let’s hear your questions in the comments section below!


