If you’ve stuck with us for a while, you’ve already undergone the torture of hearing us pontificate about multiple WordPress issues. However, let’s get one thing straight: Backing up your WordPress website is the one piece of advice you cannot afford to ignore – because sooner or later you’re probably going to run into a serious issue, such as a site-breaking bug or hack, that will ruin your day.
Performing regular backups can be the single difference between spending hours fixing an error to put your site back together, or performing a simple restore to a working version. Worst case, not backing up could mean that you lose your site forever. In short, it’s the single most important action you can take as far as website security and maintenance goes.
Now that we’ve (hopefully) caught your attention, it’s time to go get to know our favorite WordPress backup plugin, as well as its setup process.
UpdraftPlus

There are a lot of backup solutions available for WordPress, and picking just one of them to feature wasn’t an easy choice. In the end, we decided to go with UpdraftPlus, for a number of reasons:
- You can choose from the most popular cloud backup storage providers.
- The process of restoring backups is simple.
- There’s a premium version available, with additional features
- UpdraftPlus is currently the highest-rated backup plugin on the market.
For the sake of thoroughness, let’s go through UpdraftPlus’ features one by one:
- Remote backup storage using Amazon S3, Rackspace Cloud Files, Google Drive, Dropbox, Microsoft OneDrive, Microsoft Azure, DreamObjects, Google Cloud, and good old-fashioned email.
- Simple restore functionality
- You can pick which elements of your WordPress site to include in your backups. This applies to plugins, themes, uploaded files, additional directories, and databases.
- Automatic backups at multiple intervals such as every four, eight, or twelve hours, either daily, weekly, fortnightly, or monthly.
- Configure how many backups remain in storage at any given time, so that you may have multiple restoration points.
- Email notifications pertaining to your backups.
The free version of UpdraftPlus can more than handle the backup needs of a WordPress site, and its premium version includes a lot of add-ons to help you fine tune your experience even further. Features include encrypting your database using a passphrase…

…access to the UpdraftPlus Vault as a remote storage option, a website migrator option, and multisite support, among others.
Setting Up UpdraftPlus
Once you’ve installed and activated UpdraftPlus, head over to the Settings tab on your WordPress dashboard, then click on the UpdraftPlus Backups option. This is the screen you’ll be greeted with:
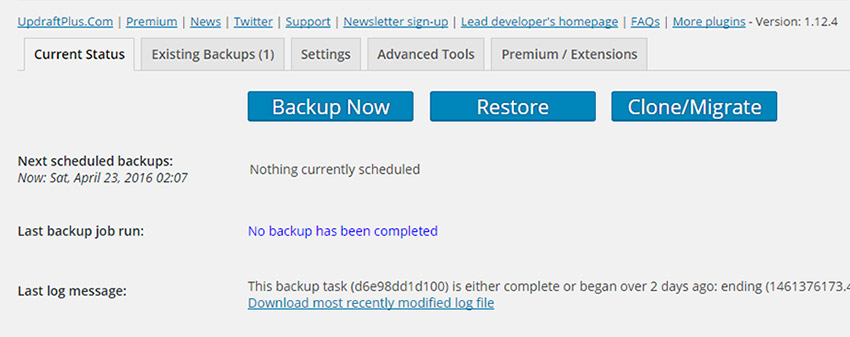
On this main screen, you’ll find two crucial options – the Backup Now and Restore buttons:

The Backup Now button is only important in case you decide to go old school and perform your backups manually. While there isn’t anything wrong with this option, it’s a bit of a waste of time, considering you can set up automatic backups with a few clicks – so that’s what we’re going to teach you how to do, then we’ll circle back to the Restore option.
Click the Settings tab. Here, you’ll be greeted with the bulk of configuration options available within the plugin – the most crucial of which are the backup schedule, remote storage option, and which files will be included in your backups. We’ll begin with the backup schedule:

Here, simply change the setting from Manual for both regular and database backups. Multiple backups per day would probably be overkill for most sites, but we’ll leave the frequency of these up to you. As for how many backups should be stored simultaneously, the default option of two is a good place to begin. This setting depends mostly on how many restoration points you wish to have available at any time, as well as how much storage space you can spare (which shouldn’t be a concern, unless your site is humongous).
Having finished with this setting, let’s choose a remote storage option for extra security. The simplest to set up here would be Dropbox. Simply click on its icon…
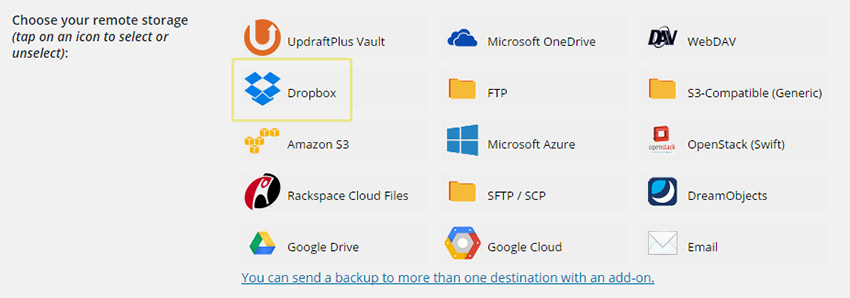
…jump to the end of the page, click Save Changes, then head back up and click on the highlighted link to complete the authentication process:
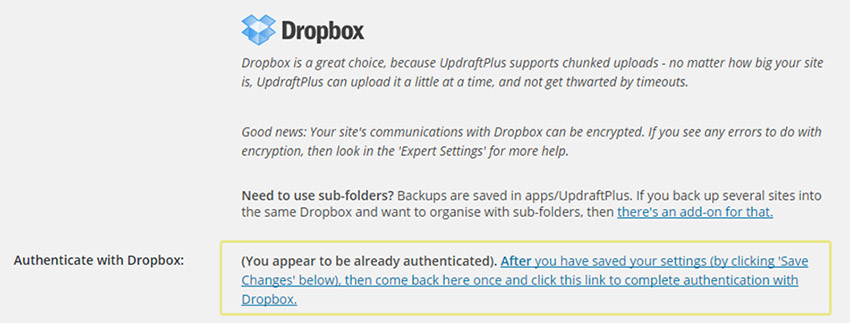
Another click here and you’re all set!
As for which files to include on your backups, it’s probably a good idea to leave the default settings untouched, so as not to run into any compatibility issues when restoring your backups:

You may also wish to enable email reports to keep track of your backups:

Aside from that, we can safely ignore the rest of the settings and the Advanced Tools tab, so let’s head back to Current Status. If you have any backups available, you can click on the Restore button, sending you to the Existing Backups tab:

There you may pick a backup and click on the Restore option in order to proceed, then watch YouTube videos of kittens or something of the sort while the plugin does its thing. That’s pretty much it!
Conclusion
It’s hard to overstate just how handy regular backups can come in. Should your site ever malfunction due to an ill-advised change, incompatibility issue, or critical error, you’re only a restored backup away from having your site running at full steam again.
Remember, all that stands between you and peace of mind for your WordPress website are the following steps:
- Install and activate UpdraftPlus.
- Follow our instructions to set up scheduled backups at a frequency of your liking.
- Configure a remote storage solution within the UpdraftPlus settings.
- If UpdraftPlus isn’t your cup of tea, feel free to try one of our other recommended picks – Duplicator or BackUpWordPress.
- Kick back and relax!
Has a backup ever saved you from a sticky situation? If so, welcome to the club – share your tale of survival with us in the comments section below!


