Picking the right theme for your needs is an integral part of the WordPress experience. We’ve all gone through the same process of sifting through the thousands available in order to find a good match, and sometimes even those good matches might require a few tweaks in the design department.
A great WordPress theme will provide a solid foundation for your website, and for some people it might be all they require. However, foundations are meant to be improved upon – and that’s what child themes are meant to help you achieve. Using child themes, you’ll be able to change the design of your theme without modifying its base code.
If you’ve spent a while tinkering around with WordPress, it’s likely that you’re already familiar with child themes. However, let’s take a moment to review the role of child themes, then guide you through the process of setting one up.
What Child Themes Are and Why You Should Use Them
A child theme is essentially a copy of another theme, which you can use to tweak the pre-existing design without affecting the ‘parent’ theme. While there’s nothing stopping you from messing around with a theme’s style.css file, all of those changes would be lost if your theme were to get updated (and not updating yours is out of the question!).
This is, of course, a big deal – nobody wants to get stuck using outdated themes or plugins on their WordPress site, nor do they want their changes lost on update. Child themes provide a simple solution to a complex problem.
Now we’ve covered the why, let’s move onto the how.
How to Create and Activate a Child Theme
You’ll be happy to learn that the process of creating a child theme is pretty easy.
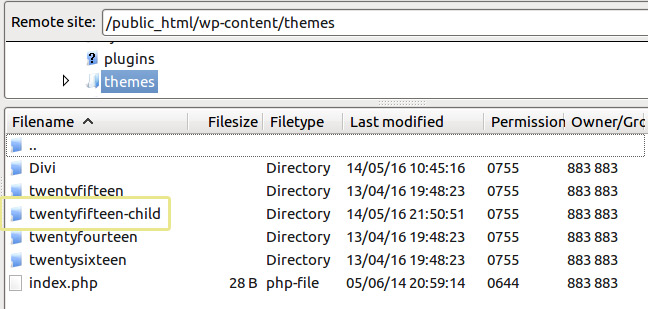
First of all, open your trusty FTP application (we recommend FileZilla), and head over to public_html/wp-content/themes. Inside you’ll find a folder for each of the themes installed on your WordPress site. What we’re going to do now is create a new folder in this directory, which is going to be the home of our child theme. For the purposes of this guide we’ll be working with the Twenty Fifteen WordPress theme:

Your new folder will (of course) be empty, so let’s fix that by creating a new style.css file in there, and typing the following inside:
/*
Theme Name: Twenty Fifteen Child Theme
Theme URI: https://www.wordpress.org/theme/twentyfifteen/
Description: Twenty Fifteen Child Theme
Author: [Your name here]
Author URI: https://wordpress.org/
Template: twentyfifteen
Version: 1.5
*/
If you’ve ever taken a look at the inside of any theme’s style.css file, you’ll know they all start out by listing the attributes, similarly to ours. This information, however, is particularly important when creating a child theme, as it lets WordPress know which theme template to copy, and which style.css to import as its baseline.
@import method: (not recommended)
Note that the previous method was to import the parent theme stylesheet using @import: this is no longer best practice. However for testing purpose this method is still working.
@import url("../twentyfifteen/style.css");Bear in mind that the Template field and the @import command need to be exactly correct in order for the child theme to function. If you’re familiar with the command line, you’ll recognize that the three dots at the beginning of @import url are telling WordPress to go up a directory, look for the twentyfifteen folder there, then look around inside for the style.css file.
Every line of CSS you write below this section will enable you to customize your new child theme without modifying its parent in any way – so go nuts!
wp_enqueue_scripts method:
The correct method of enqueuing the parent theme stylesheet is to add a wp_enqueue_scripts action and use wp_enqueue_style() in your child theme’s functions.php file.
<?php
function theme_enqueue_styles() {

    $parent_style = 'parent-style';

    wp_enqueue_style( $parent_style, get_template_directory_uri() . '/style.css' );
    wp_enqueue_style( 'child-style',
        get_stylesheet_directory_uri() . '/style.css',
        array( $parent_style )
    );
}
add_action( 'wp_enqueue_scripts', 'theme_enqueue_styles' );
?>
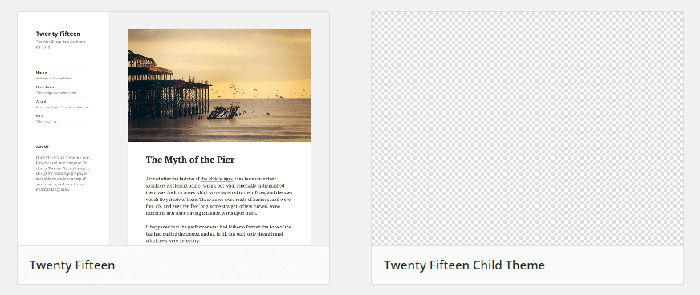
Now your new child theme is up, but it’s still not running – so head over to your WordPress dashboard and click the Themes tab. Inside you should see a new addition to your collection:

If your child theme doesn’t appear here, WordPress should provide you with a Broken Themes message at the very bottom of the page telling you why it’s not working:

In this example, we entered an incorrect value into the Template field, so be sure to double check your parent theme was spelled correctly. In our case, ours would be twentyfifteen since that’s what WordPress recognizes the theme as. If you happen to run into the same issue, just take a quick look at the style.css file of the theme you want to use as the base for your child theme.
Once you child theme appears alongside all the other grown-up themes on your WordPress dashboard, it’s time to hit the Activate button, and voila! All that’s left is to start tinkering with the style of your theme until you’ve achieved the look you want – and remember, none of the changes you make here will affect the parent theme.
Conclusion
Customizing the design of your WordPress theme can seem like a pretty intimidating process, but once you’ve learned to create and use child themes, you’ll be free to tinker around to your heart’s content without any fear of causing permanent damage to your site.
To recap, all you need to do in order to get a child theme up and running is to:
- Create a new theme folder.
- Create and populate a new style.css file.
- Activate your child theme.
Are you thinking of creating a child theme, and if not, what is stopping you? Share your insights with us in the comments section below!


