


At this point, you should have signed up for web hosting and have a working domain name. If that doesn’t sound like you, pop back a step where we explain how you can use our Hosting Finder tool to find the perfect host for your needs.
If you do have both those things, we’re going to spend this article on the next piece of the puzzle – installing WordPress.
Depending on your host, there are three common ways to get WordPress installed:
- You chose a host that comes with pre-installed WordPress. Good job, you don’t have to do a single thing!
- You chose a host with one-click WordPress installs. This fits most hosts – you’ll just have to click a few buttons to install WordPress – no technical knowledge required.
- You need to install WordPress manually. This is rare nowadays, but we’ll show you how to do it anyway in case you like the challenge.
Then, at the end, we’ll show you a quick way to import content from Blogger, Tumblr, or other blogging platforms. If this is your first website, you won’t need these tools. But if you already have, say, a Blogger blog, you can easily migrate that content to your new WordPress site.
Let’s get into it!
Do You Even Need to Install WordPress?
If you remember seeing something like “pre-installed WordPress” on your host’s website, you might not even need to bother learn how to install WordPress.
Most managed hosts, as well as a few cheaper options like SiteGround and InMotion Hosting, come with WordPress pre-installed. So that means you pretty much just need to log in to your hosting dashboard to find your existing WordPress website.
If you went with a cheap shared hosting option that isn’t named SiteGround or InMotion Hosting, then you probably don’t have that feature.
In that case, head on to the next step.
How to Install WordPress Via One-Click Installer
Nowadays, nearly every single host offers something called an autoinstaller. There are a few different autoinstallers your host might offer. Namely:
- Softaculous
- Fantastico
- QuickInstall
- MOJO Marketplace
While there might be a few interface quirks between autoinstallers, they function pretty much the same.
For our guide, we’ll use Softaculous and SiteGround’s cPanel. But again, your specific autoinstaller might have a different name and a slightly different interface. Additionally, your cPanel might look a little different – some hosts add custom styling, though the basic layout remains the same.
To find the WordPress autoinstaller, log into your cPanel account. cPanel is the industry-standard tool for managing your hosting account. You should receive your cPanel login details somewhere in the welcome emails you got after you signed up with your host.
Once you’re signed into cPanel, you should see a WordPress installer icon somewhere in the long list of options:
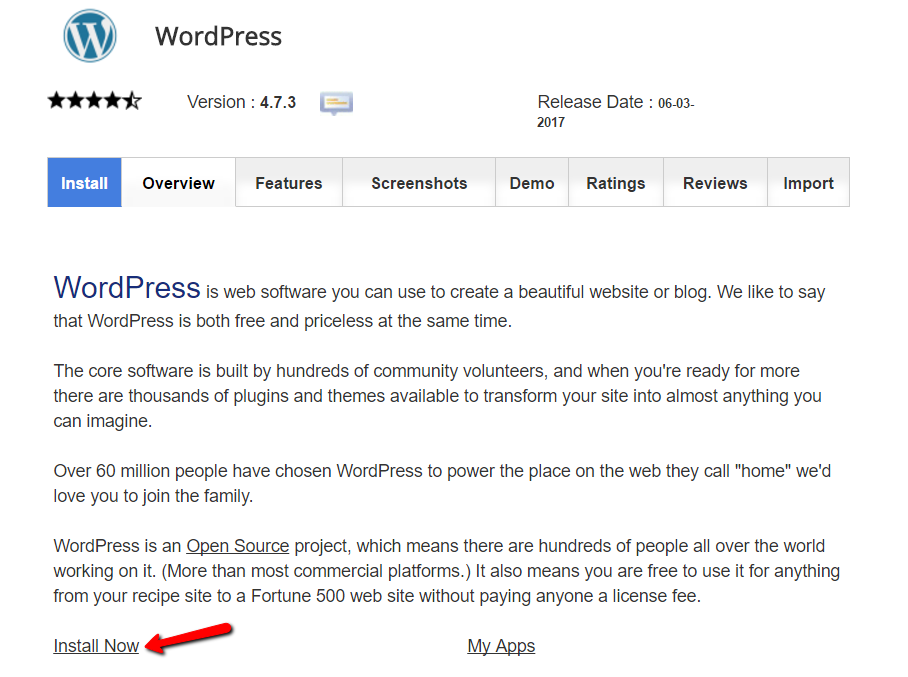
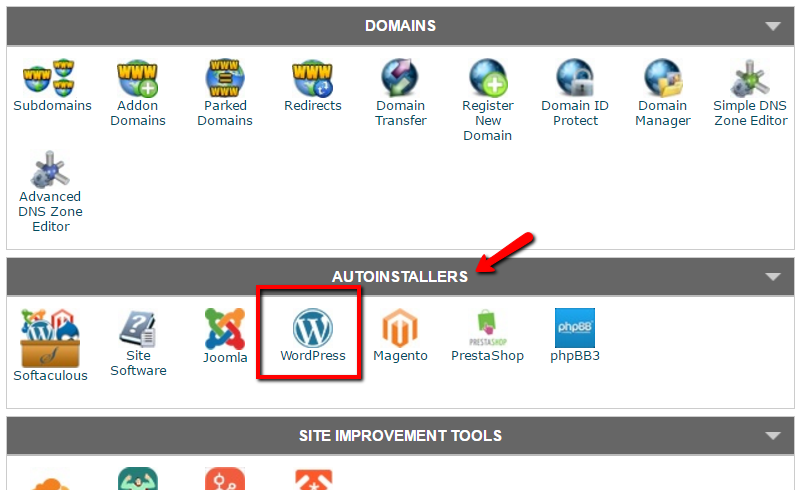 Give that a click. Then you should see a description of WordPress as well as an option to Install Now (remember, if you have a different autoinstaller, things might look slightly different):
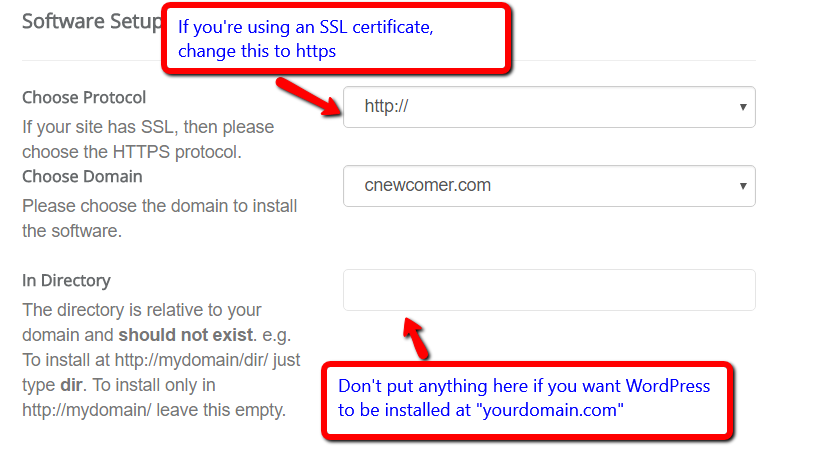
 On the next screen, you’ll need to make some choices and enter some details for your new WordPress site.
First, choose your Protocol. Unless you chose to install an SSL certificate (you would remember if you did), you should leave this as http://. Additionally, most of the time you should leave the Directory option blank:
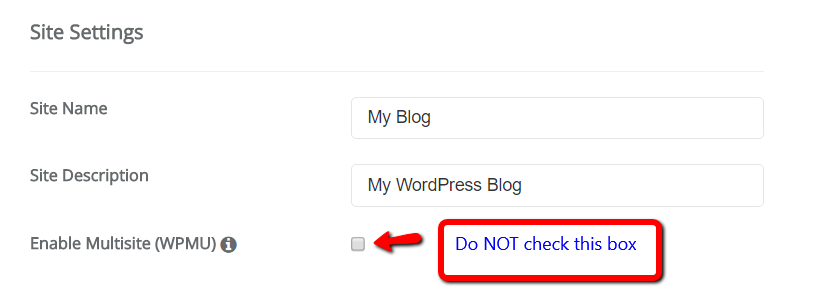
 Further down the page, you need to enter some information for your blog’s name and description. Don’t stress too much about this – it’s super easy to modify later if you ever change your mind:
 Next, you need to choose an admin username, password, and email. These are the login details you’ll use to access your WordPress dashboard once WordPress is installed. So make them something you can remember. None of these details will be public, though.
 At the bottom of the page, there are a few miscellaneous options. If you want your site to be in a language other than English, select it from the dropdown.
Otherwise, you can ignore selecting plugins and themes. You’re ready to hit install!
The installation process might take a few minutes. But once it’s done, you can log in to your brand new WordPress site at “yourdomain.com/wp-admin”. In the next part of the guide, we’ll provide you with some videos to help you become familiar with the WordPress dashboard.
How to Manually Install WordPress via FTP
Before we give you the guide to manually install WordPress, we want to remind you of one thing:
Most hosts offer autoinstallers that greatly simplify the process. There’s no downside to using an autoinstaller. So if you have the option, we recommend following the steps above.
But if you want to manually install WordPress for fun, here’s how you can do it.
To get started, you’ll need four tools/pieces of information:
- An FTP program – FileZilla is a good option, but there are plenty of free tools.
- Your FTP account details – your host usually sends you these in your welcome email.
- Access to cPanel – again, you should get these login details in your welcome email. You’ll need them to create your database.
- The latest version of WordPress – you can download it from WordPress.org.
Ok, let’s dive in.
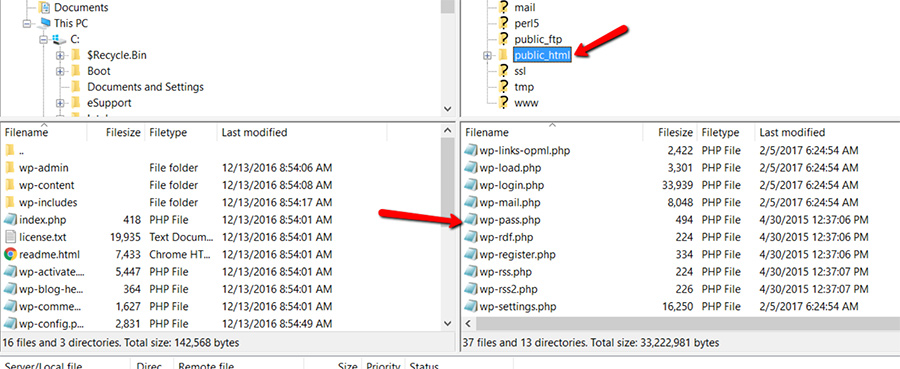
Start by unzipping the latest version of WordPress and uploading all of those files to your site’s root directory (public_html) using your FTP program. Here’s what that looks like in FileZilla:
 You’ll need to connect to your FTP account via FileZilla using the FTP account details provided by your host.
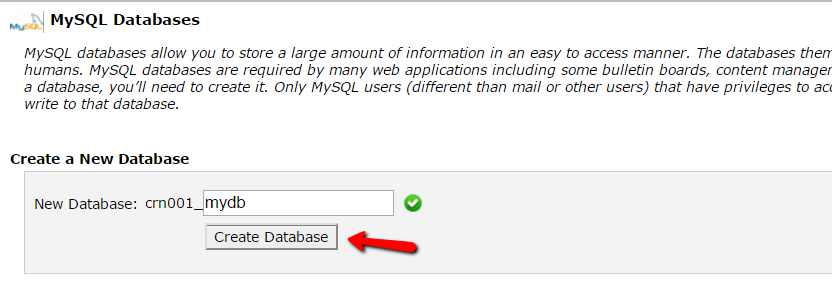
While those files are uploading, log into your host’s cPanel and find the MySQL Databases button. You’ll need to create a database for your WordPress site.
 On the next page, create a new database. The name isn’t important – just make sure that you write it down (including the prefix) because you’ll need it during the install process:
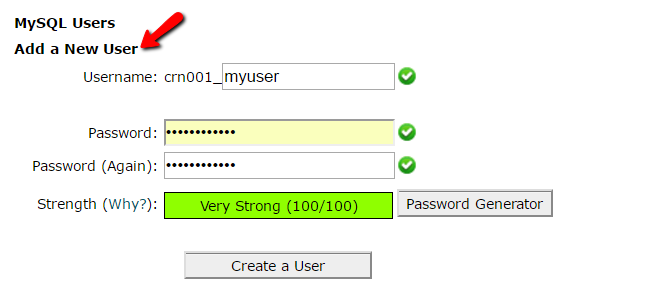
 Once you create the database, you need to create a database user and give it access to the database so that WordPress can actually connect.
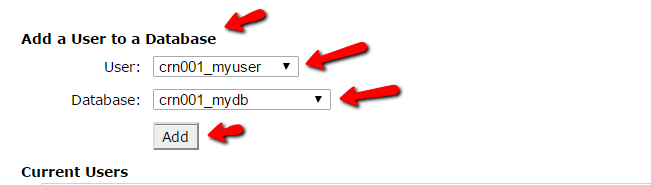
You can do that by scrolling down the page a little further and finding the Add a New User section:
 Then, you need to scroll down a little further and actually give that user access to the database you created a few steps ago:
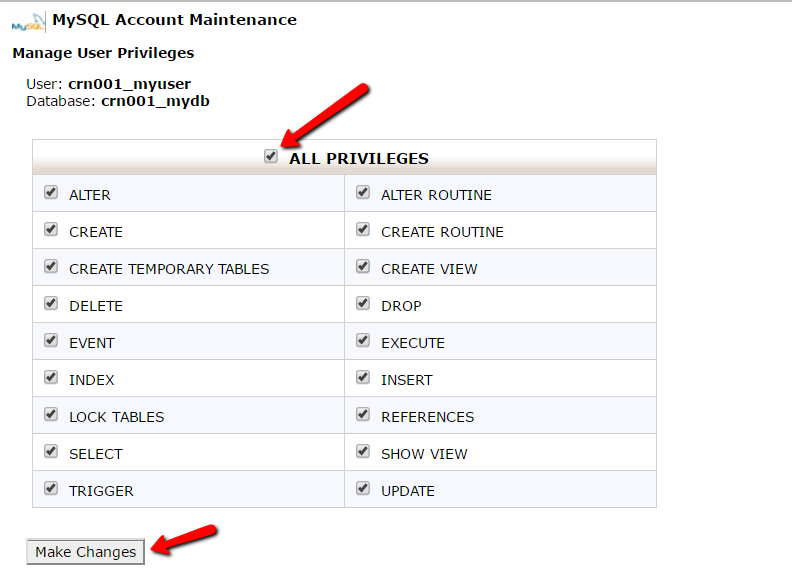
 And on the next screen, make sure to give the user All Privileges:
 Now, assuming all of the files have finished uploading via FTP, you’re ready to run the WordPress install process.
To do that, just navigate to your domain name. When you visit your site, you should see the first screen of the WordPress install process:
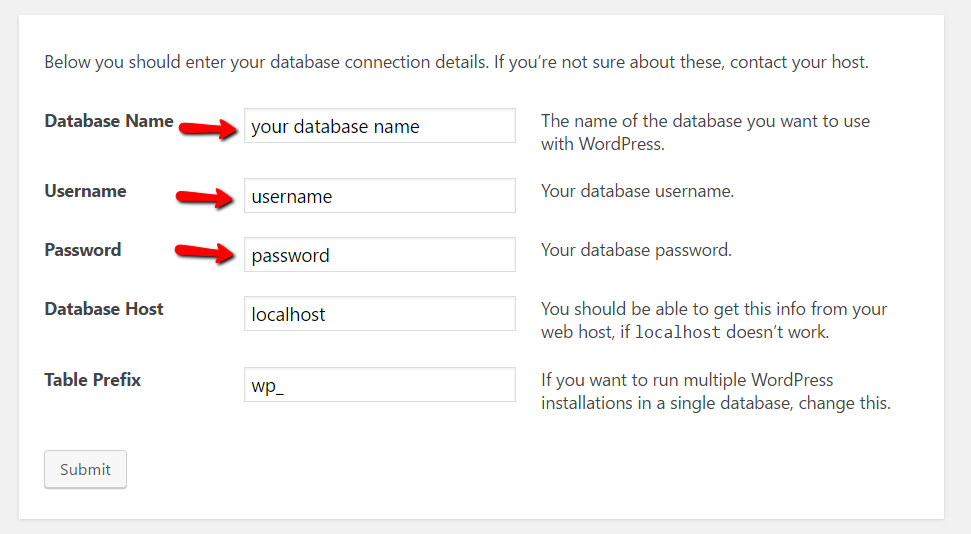
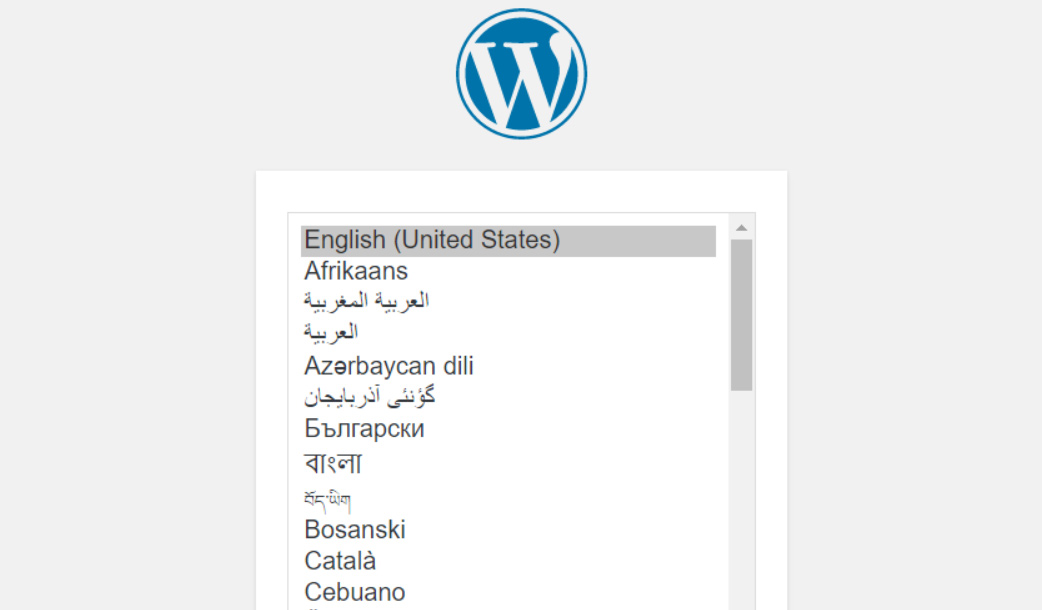 Choose your language and then continue. After a couple of clicks, you’ll see a screen where you’re asked to enter your database connection details. These are what you created in the previous steps.
Enter your:
- Database name
- Database user
- Database password
 There are a few more steps after that, but everything is very simple and well-explained. Once you’ve finished the install wizard, your WordPress site will be fully up and running!
Again, we can’t emphasize enough that, if your host offers a one-click installer, it’s much simpler to just use the provided installer. There’s nothing wrong with installing WordPress that way.
How to Migrate WordPress From Another Host
If you already have a WordPress site hosted at a different host, it’s easy to migrate to your new host.
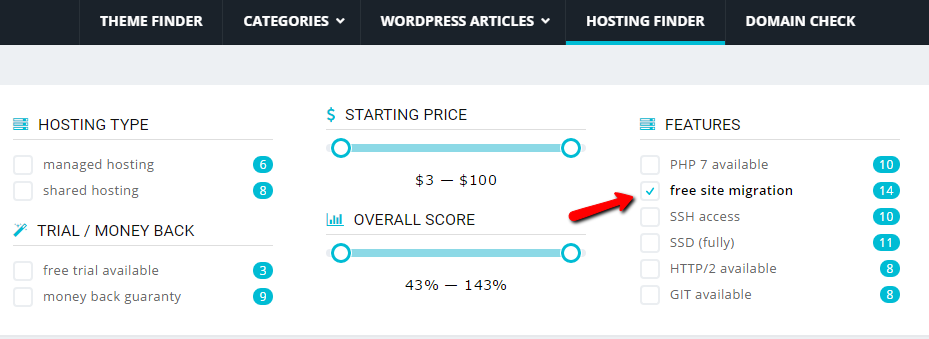
First, most hosts offer free migration, so you might not even need to do any of the work yourself. To find a host that specifically offers free migration, you can use our Hosting Finder tool and filter by free site migration:
 On the off chance that your new host doesn’t offer free migrations, you can use a free plugin called Duplicator to move your site.
Basically, you’ll install Duplicator at your current host. Then, you’ll use Duplicator to create a backup package of your site. Then, you need to upload that package to your new site. From there, Duplicator includes an install wizard that makes the process very simple.
How to Migrate Blogger or Tumblr to WordPress
If you already have an existing website hosted on Blogger or Tumblr (or a few other platforms), you probably don’t want to lose all of the content you’ve created. Nor do you have to!
See, WordPress includes a bunch of built-in migration tools to help you import content from other platforms.
To access these tools, go to Tools → Import in your WordPress dashboard (you’ll need to install WordPress first):
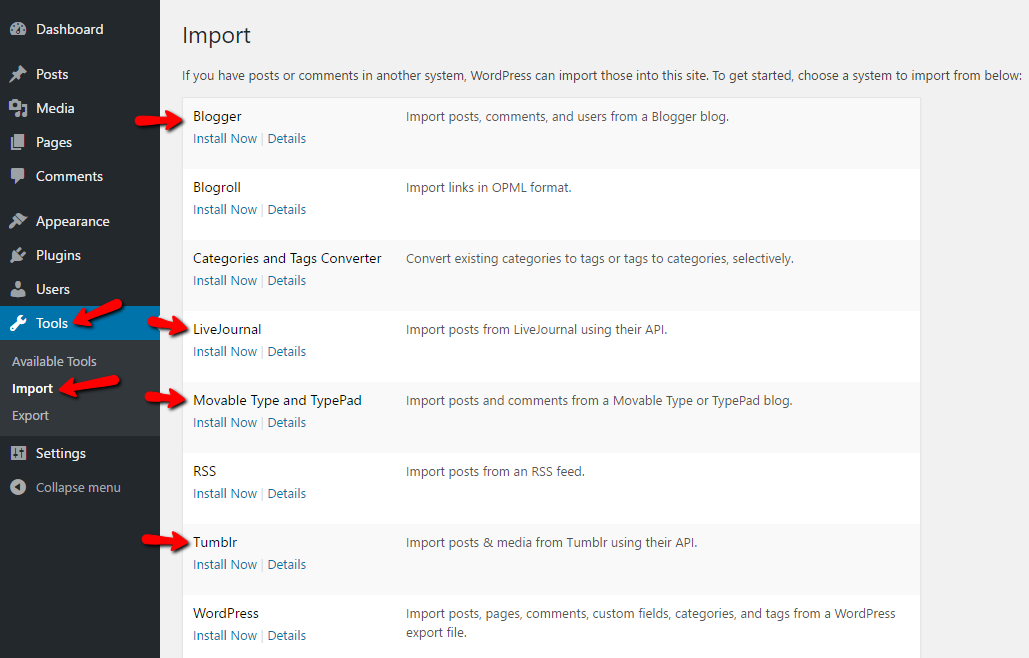 Then, you can install the specific migration tool for:
- Blogger
- LiveJournal
- TypePad
- Tumblr
Once you install the tool, WordPress will guide you through the process of importing all of your content.
And that’s it for installing WordPress. In the next section of our guide, we’ll share a number of tutorial videos that will help get you familiar with your brand new WordPress dashboard.